0345 363 1130
 info@xchangetraining.co.uk


Tutorial: Making Best use of Smart Objects in Photoshop
From time to time I take a fresh look at my workflows to see if new and improved options are available. In the case of Photoshop I embraced the idea of Smart Filters from their introduction over ten years ago, but I know from my teaching that many users have a limited understanding of the potential of Smart Objects; spawned by the Smart Filter concept. This tutorial illustrates how to make the most of Smart working. I have chosen to use a photograph, but many of these steps apply to graphics and illustration too.
- Starting with Raw
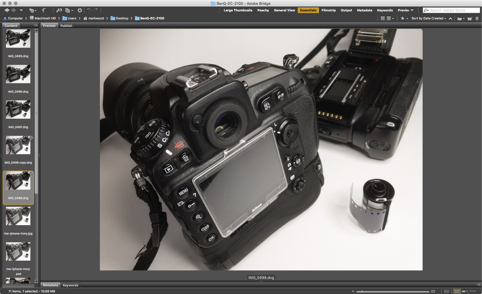
Figure 01: mw-XCT-Q4-2017_001.jpg. A photographer’s workflow would usually start with raw photographs. Here I used Adobe Bridge to Import files from my camera, and selecting an image I double-click its thumbnail to open it in Adobe Camera Raw.
- Adobe Camera Raw
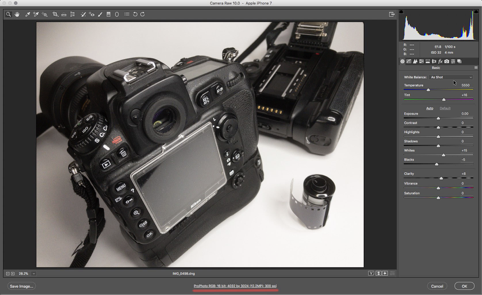
Figure 02: mw-XCT-Q4-2017_002.jpg. Raw photographs are only semi-processed in camera, hence the name raw, it is not an acronym like JPEG (Joint Photographics Expert Group, just in case you were interested). The image enhancement in Adobe Camera Raw (ACR) is excellent, by switching on Smart Objects in ACR’s Workflow Options you can return to ACR at anytime in a Smart Object workflow to further adjust your photograph. To access the ACR Workflow Options click the hyperlink at the bottom of the ACR window, underscored here in red.
- ACR Workflow Options

Figure 03: mw-XCT-Q4-2017_003.jpg. In class I explain the pros and cons of using the ProPhoto RGB Colour Space, as selected here. If in doubt choose sRGB. For Depth I chose 16 Bits/Channel to maintain good tonal richness in my photographs. Again this is something I discuss in class. However the most relevant option here is at the bottom of the Workflow Options window. Open in Photoshop as Smart Objects has been selected. Click OK to close the window.
- Image Adjustments in ACR
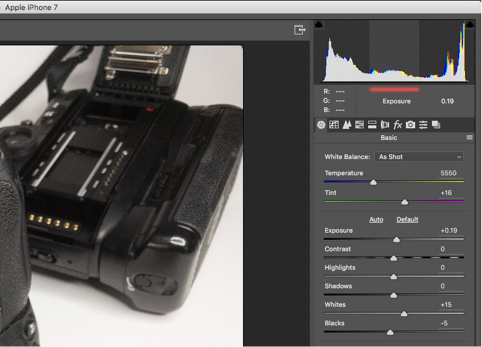
Figure 04: mw-XCT-Q4-2017_004.jpg. All aspects of Photoshop seem ripe for exploration, but rather than explain the functions of Exposure, Contrast, Highlights, et al it is worth knowing that in new versions of ACR you can click-drag inside the histogram. In Figure 04 I am dragged the middle part of the histogram, underlined in red, note the lighter grey column denoting the tone range I am adjusting. Understanding histograms is essential in image processing, but in ACR you can freely experiment because all the adjustments you make here can be reversed or revised at any time.
Once you have made some image adjustments you click Open Object in the bottom right of the ACR window. This opens the photograph in Photoshop.
- Dusting
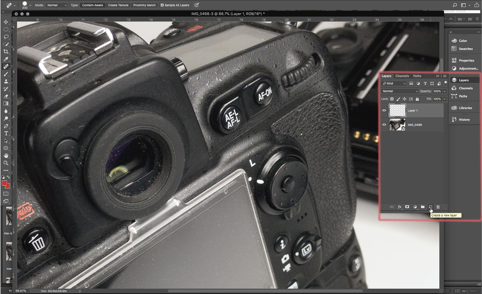
Figure 05: mw-XCT-Q4-2017_005.jpg. I tend to clean up dust, spots, and blemishes later in my workflow, but I show it now to state that the Clone, Spot Healing and some other tools do not work on Smart Objects. In this shot I need to clean up some dust that has collected in the eyepiece of the camera in the foreground. The Spot Healing Brush would be ideal for this, so I create a new blank Layer. The Layer panel bound here in red has a Create a new layer button, found just to the left of the Trash icon.
From the Tools panel I select the Spot Healing Brush. With the Spot Healing Brush selected the Options Bar, which runs across the top of the Photoshop window, just under the Menu Bar, displays parameters for the brush. Selecting Sample All Layers will let me clean up the dust.
6. Cleaning Up The Background
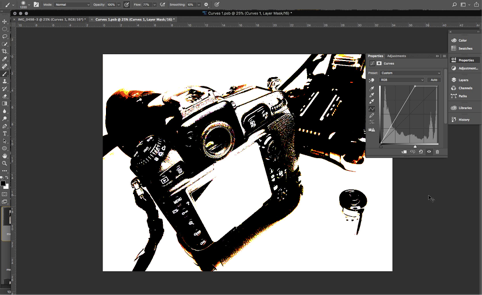
Figure 06: mw-XCT-Q4-2017_006.jpg. The backdrop for this photograph is a sheet of white paper. I would like the paper to be brighter so I would use either a Levels, or Curves Adjustment Layer to achieve this.
From the bottom of the Layers Panel I have chosen Create new fill or adjustment layer, from that pop-up menu I selected Curves. Although I use a properly calibrated monitor I like to see a clear indication of my brighting operation. With both Levels and Curves, if you hold down the Option key on your keyboard before dragging the White Point slider to the left, Photoshop shows a graphic overlay of your adjustment. In Figure 06 the White Point Slider can be seen almost in the middle of the Curves histogram. The graphic overlay can also be seen. Any parts of the image that have turned white are pure white in the photograph.
7. Dodging & Burning
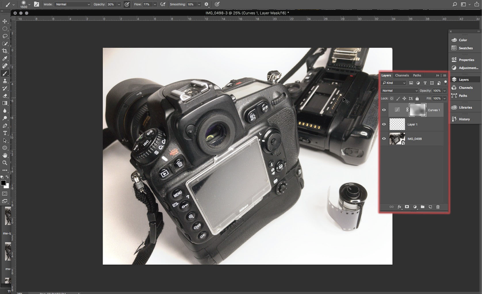
Figure 07: mw-XCT-Q4-2017_007.jpg. In Figure 07 the Layer Panel has been highlighted in red, the Curves Adjustment Layer is at the top of the stack of three Layers. It appears to be smudged in grey. This is the result of using a Brush to paint back tone in the photograph. This is using Masks on Adjustment Layers, and is a huge part of my Photoshop tuition. In class this concept is broken in gently, it is not complicated but writing about Adjustment Layer Masks here would make it seem terribly difficult.
8. A New Way to Group Items
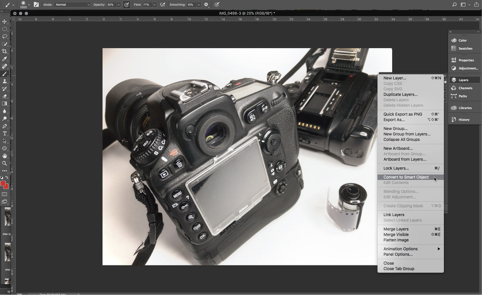
Figure 08: mw-XCT-Q4-2017_008.jpg. Photoshop Layers can be grouped, something you might want to do if you use lots of them. However, I often find that using Smart Objects is neater and more helpful. In the camera photo example the three layers have been selected and from the Layers Menu, found on the top right of the Layers Panel, Convert to Smart Object has been selected. This ‘groups’ or nests the three layers into a new Smart Object.
9. Smart Filters

Figure 09: mw-XCT-Q4-2017_009.jpg. Using the Filters menu in Photoshop is really just a matter of experimenting. However, when you apply a Filter to a Smart Object you can open up the Filter parameters again and again to help refine the look you are going for. All this is done in a non-destructive way, because you are working with a Smart Object.
In Figure 09 an Iris Blur is being applied. The eagle eyed may have noticed that the photograph of the cameras was taken on an iPhone 7 (see the top left of Figure 04). As such the photograph is sharp edge-to-edge, but I want to create a sense of depth by having the cameras blur into the background, hence using Iris Blur.
10. Sharpening The Film Canister
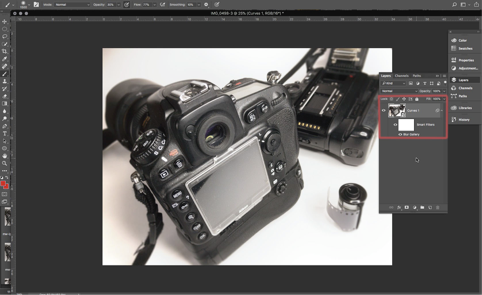
Figure 10: mw-XCT-Q4-2017_010.jpg. Applying a Filter to a Smart Object causes a Mask to appear. To adjust the blur now I would need to double-click on the label Blur Galley in the Layers Panel.
To sharpen up the film canister, I need to remove the Iris Blur from that part of the photograph.
11. Smart Filter Masks

Figure 11: mw-XCT-Q4-2017_011.jpg. In Figure 11 you can see a black dot on the Smart Filters Mask, the area is bound in red. I use soft edge brushes for most of my masking, so I don’t get hard edges. Where a Mask is black the Filter or Adjustment it belongs to stops working. In this example the Iris Blur disappears. It’s a massive concept but well worth learning.
12. Changing Your Mind
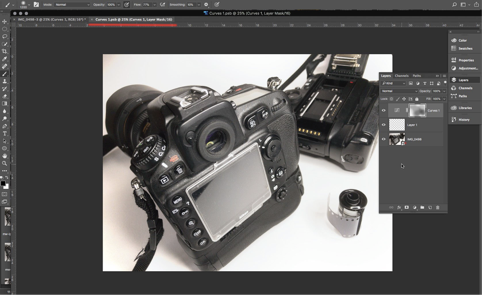
Figure 12: mw-XCT-Q4-2017_012.jpg. Whether it is you or your client there are times you will need to make changes to an image. Because this Smart Object workflow is non-destructive, to go back to adjust the dust removal or paper whiteness I would double-click the Smart Object Layer icon, labelled Curves 1 in Figure 11. Doing this opens the Curves 1 Smart Object as a new window in Photoshop, seen in Figure 12 as a new tabbed window, its title is underlined in red. I am now free remove more dust or adjust the paper whiteness, or even add a new adjustment. Though if I want to adjust the tones of the photograph I can go right back to Adobe Camera Raw. The bottom Layer in Figure 12 is labelled IMG_0498, double-clicking its thumbnail opens the original raw file in ACR.
13. Back To The Beginning
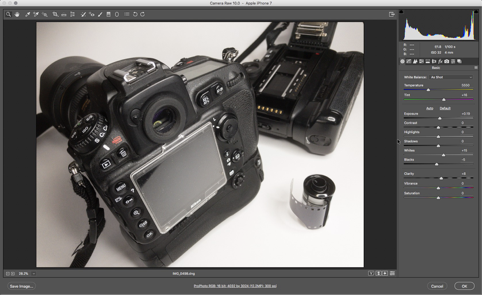
Figure 13: mw-XCT-Q4-2017_013.jpg. The Smart Object workflow can be totally non-destructive. This means I can work at speed and not have to worry about fine-tuning edits as they can be ironed out. I save my layered Smart Object files in native Photoshop format, file extension .psd. I can Place these psds into Adobe Illustrator or InDesign knowing that once viewed in a page layout, if I need to go back and adjust the image, I can step back through all the nested Smart Objects, even right back to the beginning of my processing workflow at anytime.
It is best to demystify Photoshop in class, please get in touch to find out more about the Photoshop tuition we offer.
Mark Wood – Artist, Writer, and Educator.